Framework 10" Rackmount NAS
Published on: December 23, 2025
Updated on: May 14, 2026
7 min read
Overview
The Framework NAS, or as I would better call it—FrankenNAS, is a pet project of mine born from a few different desires left unsatiated by commercial options. I’m using it as an all-in-one server to host my files, game servers and self-hosted services like Home Assistant. I built this specifically to be rackmounted on my 10” mini rack.
Here’s what I think this does better than anything commercial:
- Cheap: Mainboards can be sourced cheaply either second-hand or as refurbished/QA-rejects from Framework themselves. I was lucky and able to get a fully-functional 8-core 5.1GHz 7840U mainboard for just $50 from their Mystery boxes. Additionally laptop mainboards are designed around energy efficiency and will save more in power compared to DIY ATX servers.
- Modular: The Framework mainboards are by design, modular. Unlike a commercial NAS, you don’t have to buy an entirely new compute, power supply, backplane, case and NIC if you just want to upgrade from 2 to 4 bays. With a mainboard you can replace any of these individually. Suddenly need 2.5GBe? That’s just $20. 8 cores not enough? Upgrade the mainboard and keep the rest.
- Performant: Many commercial NAS’s are stuck with 4GB RAM and 2-core processors. This is fine for running a proprietary OS, but it is completely insufficient to run containers or VMs. My goal is to also be able to run Home Assistant, game servers, and other self-hosted programs. What I lose in reliability by having a single machine, I can make up for in cost and size.
With that said, there are downsides to compared to commercial alternatives that must be considered:
- Less reliable: While I’ve been able to achieve uptimes of multiple months, this is far from a ‘set and forget’ solution.
- No ECC support: None of framework’s mainboards as of yet support ECC memory. While data corruption is exceptionally rare, data integrity is not guaranteed.
The Build
Bill of Materials
| Item | Cost | Purpose |
|---|---|---|
| Framework Mystery Mainboard | $51.36 | NAS motherboard & CPU |
| 16GB DDR5 5600 SO-DIMM | $48.75 | RAM |
| ML1220 Coin Cell Battery (optional) | $10.08 | Saves BIOS settings; mainboard works fine without |
| USB-C to 5x SATA 3.0 | $20.23 | eSATA data ports for drives |
| SATA Data cables | $2.13 | Drive data |
| SATA Power Splitter | $3.22 | Drive power distribution (generally not recommended) |
| 24-Pin PSU Adapter | $1.06 | DON’T BUY. Scam item with no PCB traces. Intended drive power distribution, REPLACE WITH ATX PSU Switch |
| PSU | $0.00 (Salvaged) | Drive power supply |
| 2.5Gbe RJ45 USB-C Adapter | $9.07 | Ethernet connectivity |
| 2U 10” NAS Case | ~$3.50 (224g @ $14.00/kg PETG) | 2U 10” Rackmount 3D Print |
| x4 4 TB WD HDD | N/A | Drives |
| 512GB Teamgroup SATA SSD | N/A | Drives |
| 1 TB M.2 NVME | N/A | Drives |
| Total Cost: $141.77 excluding storage |
Assembly
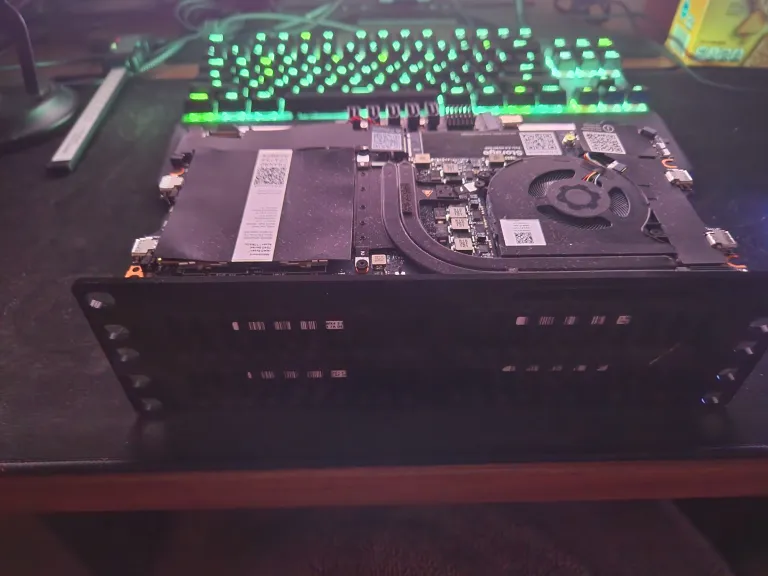
From the Framework mystery box I lucked out on getting a 7840U, which normally retails at $500. Since there was no visible damage to the mainboard, I continued and ordered a 16GB DDR5 SODIMM. Fortunately, the mainboard booted without issue, and I have encountered no hardware issues. Based on the sharpie marks around the HD audio port, I’m assuming that is what caused the reject.
Already for only $100, the 7840U+16GB DDR5 destroys any commercial options. And with it being a laptop board, it is incredibly power efficient (6-25W). The only issue with Frameworks mainboards is the lack of ports like SATA, RJ45, or PCIe. Instead, I had 4 USB-C (2x USB4, 2x USB3.2), 1 M.2 B and 1 M.2 E keys to work with.
To connect data to my 4 HDDs and 1 SSD, I used a USB-C (10G) -> M.2 -> x5 eSATA controller for drive data. To power the drives, I salvaged the seasonic PSU from the DS1511+ and used a 24-Pin ATX PSU -> SATA splitter.
Immediately, I had issues with the 24-PIN PSU adapter where the PSU would be stuck in standby mode. In traditional PC cases, there is a power button to tell the PSU to provide power. However, there was no such button on the PCB. Therefore, I soldered a small toggle switch between the 24-pin’s PSU_ON and COM wires. I cut off the rest of the switch’s metal tabs to eliminate accidental shorts.
Switching on the PSU now lit up the PCB’s 3.3V, 5V and 12V LEDs. However, using a multimeter, I discovered that absolutely none of the peripheral pinouts had any voltage despite the 24-pin supplying the correct 12V, 5V, 3.3V, COM and -12V voltages. With further testing, I found that there wasn’t even any traces linking the MOLEX, SATA or other pinouts to the 24-pin except for a common GND. This threw a bit of a wrench into my plans.
Instead of waiting another 1-2 weeks for a different kind of 24-pin breakout, I decided to solder to the back of the 24-pin. I cut one of the connectors on the SATA splitter and soldered the corresponding 3.3V, 5V, 12V & COM to the 24-pin, triple-checking the connections to make sure I wouldn’t accidentally fry any of my drives or potentially worse. After testing, I coated the back of the board in silicone conformal coating for insulation.
I tested the drives one by one with my laptop where they all powered on and were detected successfully through the USB-C SATA controller without issue. Running 5 drives off of a single SATA power cable is generally not recommended. SATA power connectors are rated for up to 54W, but with 4 HDDs, they could potentially pull up to 100W peak when spinning up. However, this is very brief and during normal operation they run at 25-40W max. Fortunately, the USB-C SATA adapter staggers the spin ups for the HDDs which keeps peak power draw low.
Lastly, I attached the 2.5Gbps RJ45 USB-C connector into the mainboard.
Setting up Software
BIOS
I first updated the BIOS on the mainboard from 3.03 to 3.17 following these steps
- Note Framework Mainboard can only recognize FAT32, Windows only lets your format exFAT/NTFS, so use Rufus to format FAT32
- Use Non-bootable, GPT, Large FAT32
- When extracting, zipped contents (/efi) must be in root
- When booting on drive, script complained about
Error: Cannot find a EFI system partition!, to FIX:- Open command prompt,
diskpart->list disk->select disk X [USB] select partition 1- Enter
set id=c12a7328-f81f-11d2-ba4b-00a0c93ec93bto set EFI System Partition - exit, unmount the drive and retry
- Open command prompt,
After updating the BIOS, I applied these settings:
- Standalone operation: Enabled
- Standalone detection: Disabled
- Power on AC attach: Enabled
OS
For my software options, I agonized on the differences between TrueNAS Scale, unRAID, OpenMediaVault, ZimaOS, bare-bones linux and all other options. Of these, I booted and tested both unRAID and ZimaOS. However, I ultimately went with Proxmox with OpenMediaVault for my server.
Proxmox Setup
- Install ISO onto Flash Drive
- Install Proxmox w/ GUI
- My SATA drive wasn’t listed at first, only my M.2s. To fix this I:
- Rerun installer in debug mode
- Enter exit to continue terminal install
- Run
lsblkto ensure that drive is detected (sda) - Run
sgdisk --zap-all /dev/sdawhere /dev/sda is the drive you wish to flash to - Enter
exitand the drive should now appear in the GUI
- Restart and open Proxmox web GUI
- Specific issue related to my 2.5GBe NIC (My 1GBe UGREEN HUB worked fine)
- https://www.apalrd.net/posts/2023/network_realtek8156/
- This fixed it:
- ethtool to get device (mine was enx00e04c68003c)
- nano /etc/network/interfaces
- add
auto enx00e04c68003ciface enx00e04c68003c inet manualabove auto vmbr0 - change
bride-ports nic1tobridge-ports enx00e04c68003c
Setting up OMV
After setting up Proxmox, I made a VM for OMV to act as a virtualized NAS. I passed through my 4 HDDs to the VM and made 2 2x4TB pools using the mergerfs plugin. The first 8TB pool holds all my data with the second 8TB pool acting as a backup.
I then set up SMB shares so that I could access these drives over the network.
Setting up AMP
To host servers for my favorite games, I chose to use AMP. This vastly simplifies setting up multiple containerized servers and offers a nice dashboard to manage them.
Designing the Case
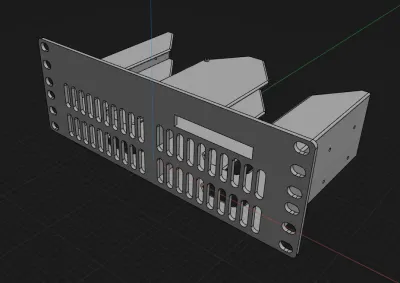
Lastly for the case, I designed around a standardized 2U 10” rackmount size. This is just enough room to fit the 4 drives and the framework mainboard. I modeled my design using Shapr3d. After two print iterations I managed to dial in the exact framework and HDD hole placement. The initial v1 was also incredibly rigid at 4mm wall thickness, so I reduced this to 3mm to save space, filament and print time. The chassis now has some flex but is still very robust.
The v2 design works great for my use case. However, I did not consider the minimum bend radius of the usb-c cables which increases the NAS’s effective width. This makes it unsuitable for 10” racks with closed sidewalls. Instead, I’ve opted to use the design as a standalone unit.